Sunday, April 24, 2016

The "Taj MaCoop" Project

The Taj Ma Coop

We were walking through the local feed and hardware store looking for... well to be honest I don't even remember why we were there.  Regardless of the intended shopping list: we came home with 15 adorable little fuzzy soft chirpy stinky chickens.  That's right I said chickens.  We are not farmers.  We are not ranchers.  We have a cat (that my husband tolerates at best) and a fish tank.  Now, however, we are trying our hand at having chickens too.  Chicken farming is an exciting new adventure for our family that poses more than a few problems or lets call them opportunities to learn.

Learning opportunity #1:  Where do chickens live?  Chickens begin there lives in a brood box, consider it temporary housing for babies.  My handy hubby whipped one together in an afternoon, no problem.  He pieced together some spare lumber from around the place and build a brood box that can be easily converted to a shelf for the shop once the chicks out grow it. Easy enough.


Learning opportunity #2: What is needed for chickens to live in the brood box?  A lot actually.  Chickens need to be very warm so they require a heat lamp.  Also, the hubby built our brood box high enough that they are level with the shop window so that they could see out and feel the warm sunlight.  Can you say spoiled?  The chickens will be in the box 24/7 so there needs to be a place for them to potty.  Add some straw or wood chips to the flooring to catch/ soak up the droppings.    They also need food and water.

Learning opportunity #3:  What do chickens eat?  Well, that depends on how old your chickens are.  We started our little guys off on Medicated Chick Starter to give them the best nutrition available for their age.  We have since switched to Organic Scratch designed for larger birds.  Now that the chickens have eaten they are thirsty.


Learning opportunity #4: What do chickens drink?  Water you say.  That's what I though too.  All animals drink water.  Well, chickens are rather high maintenance in this department.  They do drink water but are much healthier if the water contains a lil' somethin extra.  We use this...


Learning opportunity #5:  How do you build a chicken coop?  Well, if you are my husband you research dozens of different coops on the internet, you read through several blueprints and floor plans (yes chicken coops have multiple floor plans) and then after all of that research you wing it. Haha.  Not only do we draw up no plans other than the one floating around in my handy hubby's head but we also change the plan several times throughout construction.  I will say that it turned out beautifully even though it took up much more of my time than I would have liked and cost more in materials than I had anticipated.  My handy hubby overbuilt and meticulously detailed what we now affectionately call the "Taj MaCoop".   Hubby did good and did most of it himself.  I helped out every day but had to pause every few hours to nurse and change the baby or get the sassy pants 4 year old a snack, drink, toy, or change the tv channel, etc. 

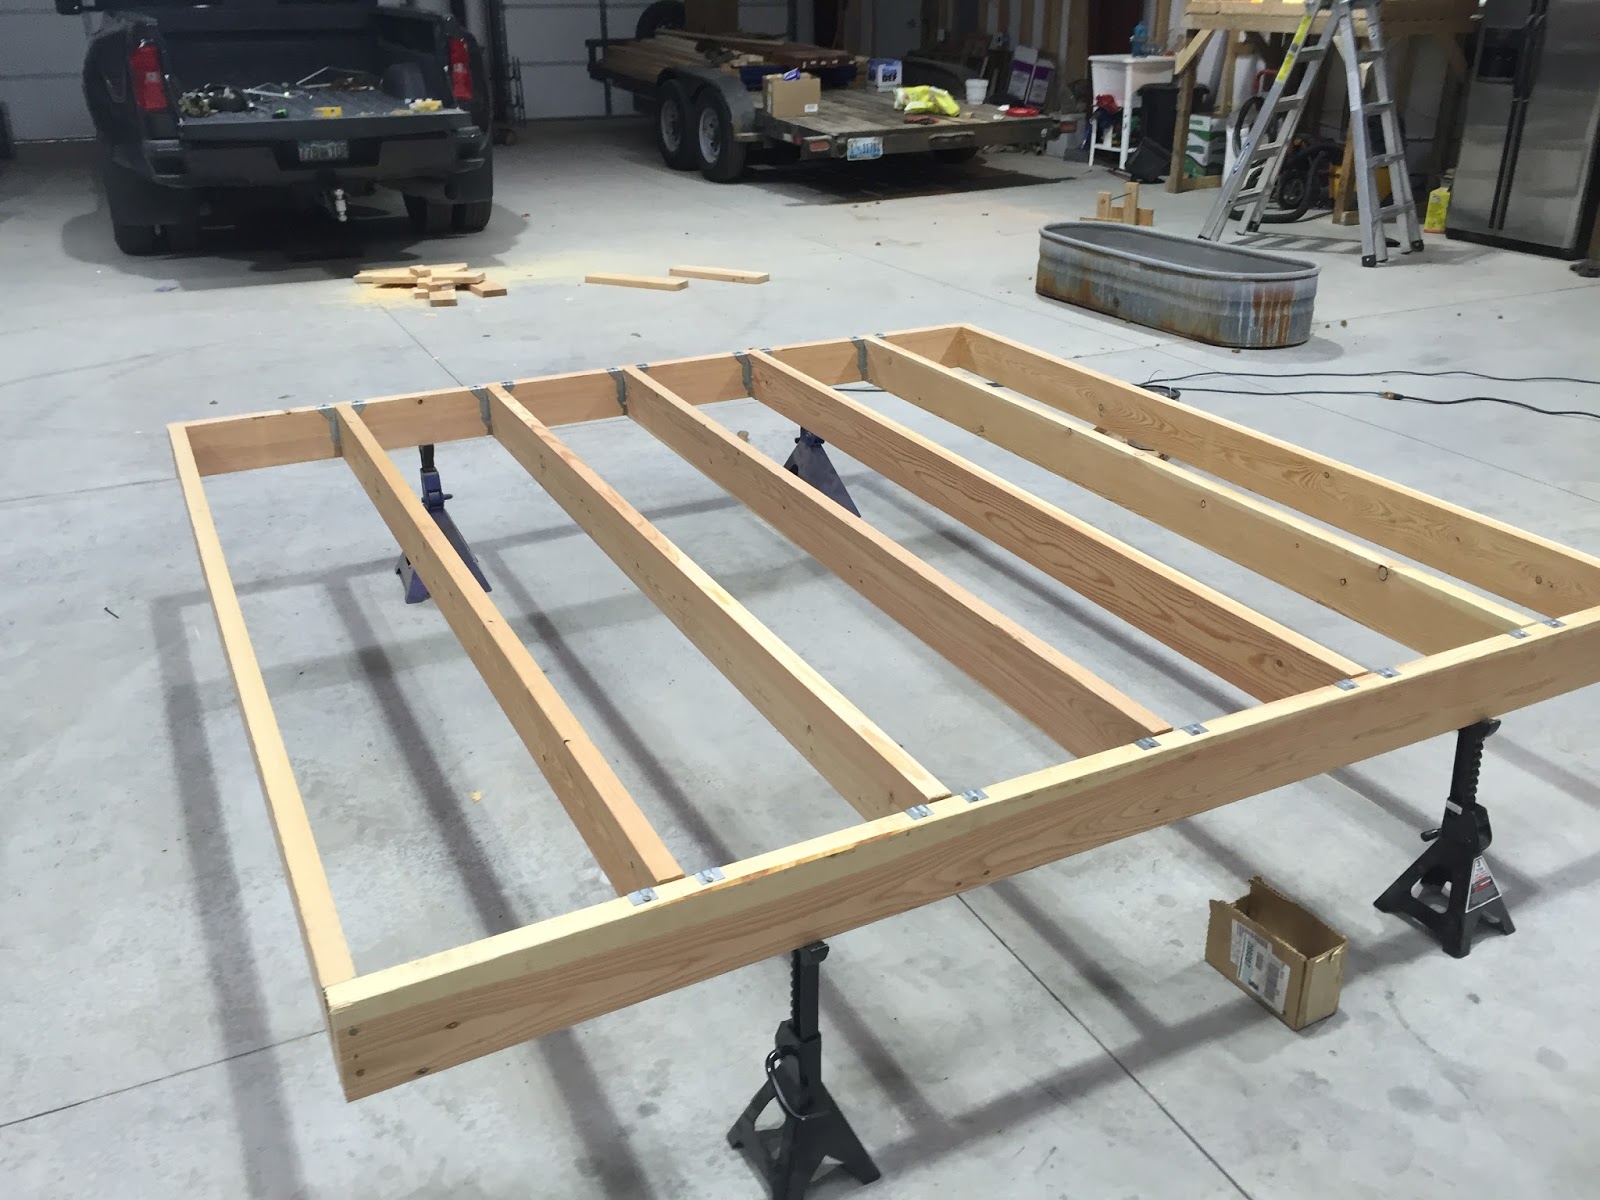
Step 1 of Chicken Construction:  Framing. 
The handy hubby actually did most of this while the girls and I were snowed in with the flu at my sisters house over spring break- full story in an earlier post.    He built the floor first and then mounted it on a skid of 4"x4"s so that we can drag the coop around the farm with the tractor to clean under it or move it if we decide to.  He then decked the floor and framed the walls leaving openings for our windows and man door.


Step 2 of Chicken Coop Construction: Sheeting the frame.
We added OSB board and covered it with siding to be painted later to match the shop.  


Step 3 of Chicken Coop Construction: Roofing
This is our first attempt at roofing so we were a bit nervous about trying it but we did it: tar paper, shingles and drip edge. 


Step 4 of Chicken Coop Construction: Paint
I painted the interior of the coop bright white because chickens are suppose to lay better in a bright environment.  I painted the exterior gray to match our shop with brown trim and a red door.  


Step 5 of Chicken Coop Construction: Windows
Luckily we had a few dozen old windows laying around from a previous unfinished project so my handy hubby ran them through the table saw to square their old ragged edges and I painted them to make them look spiffy.


Step 6 of Chicken Coop Construction: Finishing Touches
My handy hubby glued down some laminate flooring to help protect the floor and extend it's life.  We mounted all the doors and closures and touched up the paint. 
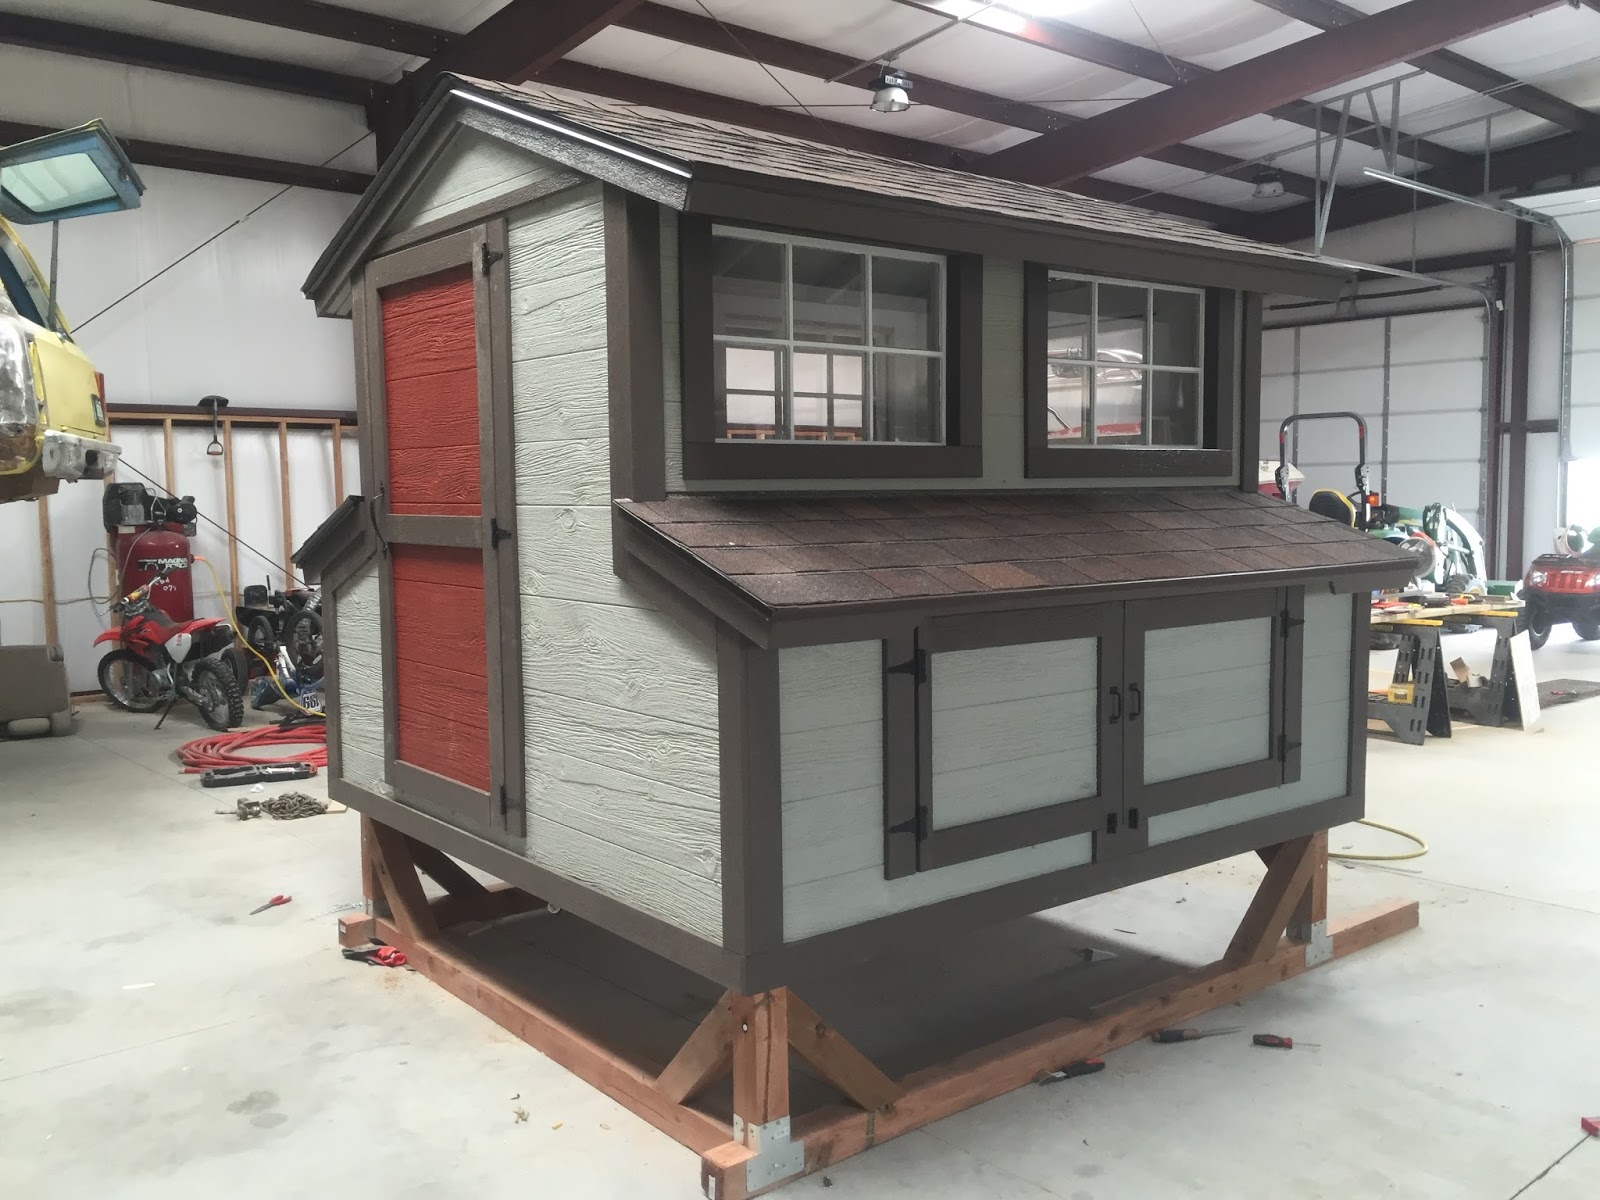

Step 7 of Chicken Coop Construction: Moving it outside!
My handy hubby wrapped a chain around the legs of the skid and hooked it up to the ol' John Deere and drug the entire Coop outside and into place.  Daughter #1 spread some shavings around inside to make our ladies feel comfy cozy and right at home.  We then had to carry the girls 1 by 1 out to their new home.  They love it!  The Taj MaCoop has 6 hen boxes, 2 roosts, a man door, 5 windows, chicken door with ramp, hen box access door and food/supplies storage the length of the coop with 2 exterior doors.  My handy hubby even wired an outlet box into it so we can plug in a heat lamp or light if needed.  He also installed a couple of vents to help keep the air flowing inside.  These are some spoiled birds!


Learning Opportunity #6: How do you catch chickens in order to get them back into their coop at dusk?   
??? If i figure it out I will let you know. :-) 


Friday, April 15, 2016

Homemade Chicken & Noodles


     It's spring break, yay! The kids are out of school for 2, that’s right 2, weeks and we are headed on a cross country road trip with my sister and niece to visit my every inspiring and beloved 96 year old grandmother after spending a fun filled Easter Sunday egg hunting, junk food eating, and quality family time having at my mom’s house.   Well, that was the plan anyway.  We did have an awesome Easter Sunday.   We hid eggs for the kids and gorged on yummy food and treats.  We even took the kids to see “Zootopia” after lunch.  We set out on our journey the next morning.  We stopped along the way to visit friends we hadn’t seen in almost a year and we made our first scheduled stop which included not 1 but 2 toy stores and a hotel with an indoor waterpark.  Let the fun begin!! And end.  We woke up the next morning with part of the group sick and the other half exposed to the yucky bug.  Spring break, awesome girls road trip, and visiting grandma was over.   We packed up and headed home.  In addition to the rest of our good fortune (that was sarcasm- just in case it was hard to tell in print), we drove home through a storm that dumped 18+ inches of snow on us.  Spring break my foot.  It looks like a winter wonderland outside and we are stuck inside with fevers, chills, coughs, sore throats, runny noses and throbbing ear drums. 

     However,  in the midst of our fevers, mountain of Kleenex and incessant whining  my hubby accomplished the impossible and got all of us to eat, enjoy it and feel a bit better.  How did he manage this you ask?  My amazing hubby made a big batch of Homemade Chicken and Noodles.  This, in my opinion, is the perfect cold/flu, feel like death, cold weather, make you feel good food.  It is warm and hearty but easy on the tummy and so, so yummy.  Be warned that you will need a really big pot and a ton of folks to eat the batch that this recipe will render.  Enjoy!


4-5 boneless skinless chicken breasts
2 cans chicken broth
2 cans Cream of Chicken soup
2 cans Cream of Mushroom soup
4 pkgs of Grandmas extra wide egg noodles (from the freezer section- let thaw in fridge 1-2days)
1 can mushrooms
Salt & Pepper to taste

Place chicken breasts in stock pot and cover them with water.  Bring to a boil.  Reduce heat and cook until chicken is done (about 30 minutes).  Remove chicken to a pan to cool.  Add to water: soups, broth and mushrooms.  Bring to a low boil.  Shred chicken and add back into stock pot.  Drop noodles one by one into pot (if you don't separate them as you add them they will cook into a large clump).  Cook until noodles are done (they will be a lighter color).  Salt and pepper to taste and serve. 


Thursday, March 24, 2016

Diaper Cream

     I have 4 daughters.  I try to feed them healthy whole foods and avoid processed sugar, soda, and fast food when I can.  I do not let them use the internet unsupervised.  They can not stay home alone for more than an hour or so and aren't allowed to go to friends homes when their parents aren't home. They don't have cell phones or Facebook and can't date.  We try to always apply sun screen and bug spray when needed.  They must always wear their lifejackets in the boat and on the lake shore.  They never get into a car without bustling their seatbelts.  I do what I can to keep them healthy and safe and to avoid any unnecessary risks.  I feel like all good mommies and daddies try to do the same... so why do we use personal care products on our children that are filled with yucky chemicals, preservatives and additives?  Shouldn't we try to use products that are natural and healthy without being filled with carcinogens and other harmful substances?  I feel like this is an area of parenting where I have failed for years.  I purchased whatever products where on sale or clearance without every reading an ingredient label.  Well, no more!  I am trying to do better by my family and myself by making products that I am able to and purchasing natural products that I am unable to make myself.  I am educating myself on natural products and remedies and incorporating natural products and essential oils throughout our home and lives.

    As a mother of 4 I have, a time or two, needed to use diaper cream, ointment, or salve on a tiny baby bottom.  I used the named brand product that is widely available and fairly inexpensive for a long time but now I am making my own diaper cream!  It is easy to make and works well.  I put mine into an empty deodorant container for easy application.


Monday, March 14, 2016

Kirk's Spicy Garlic Lime Chicken

I am so thankful to have a hubby who can cook and cook well!  Here is another of his yummy recipes.  I snapped a pic of mine (after devouring over half of it and thinking "OMGawsh slow down and take a pic before it is gone!") so you could see the finished product.  Enjoy!


Kirk's Spicy Garlic Lime Chicken

4 Boneless Skinless Chicken Breasts

Spice Mix-
1 1/2 tsp Salt
1/2 tsp Black Pepper
1/2 tsp Cayenne Pepper
1/4 tsp Paprika
1/2 tsp Garlic Powder
1/4 tsp Onion Powder
1/2 tsp Italian Seasoning

Sauce Mix-
2 tbsp Butter
1 tbsp Olive Oil
2 tsp Garlic Powder
3tbsp Lime Juice
1/2 cup Chicken Broth

In a small bowl, mix together salt, black pepper, cayenne, paprika, 1/2 tsp garlic powder, onion powder and Italian seasoning.  Sprinkle spice mixture generously on both sides of chicken breasts.

Heat butter and olive oil in a large heavy skillet over medium heat.  Saute chicken until golden brown, about 6 minutes in each side.  Sprinkle with 2 teaspoons garlic powder, chicken broth and lime juice.  Cook 5-10 minutes stirring frequently to coat evenly in sauce.  

That's it!  So easy and so so yummy!! We served it with mashed potatoes and green beans.  I think it would also be great with rice, pasta or on a salad.  Let us know how you like it served. 

Monday, March 7, 2016

Toilet Fizzies

I use doTERRA essential oils in every way that I can.  One of the great ways to utilize these amazing oils is in natural cleaning products and home remedies.  I like to make these super easy Toilet Fizzies that I use to freshen up our bathrooms and clean/deodorize the toilets in our home.  All you do is drop a fizzy into the toilet bowl 1-2 times per week.  Just let it set in the bowl between uses and flush as usual after using the toilet.  They smell so yummy and can be customized with whichever oil scent you like.  I use lemongrass EO and purify blend.  This blend smells good and is antibacterial and anti fungal.  Yay for multipurpose oils!

I start by gathering my ingredients and supplies.   You will need a mixing bowl, fork, measuring spoons/cups, 1 cup baking soda, 1/4 cup citric acid, 1/2 tsp vinegar, 1 tbsp hydrogen peroxide, a silicone mold, spray bottle with 1/2water and 1/2 vinegar in it and the essential oils that you want to add.
First mix the baking soda and citric acid in the mixing bowl.  Use the fork to break up any clumps.
In the largest measuring cup I mix the vinegar and hydrogen peroxide.  Drop by drop add this mix to the dry mix, stirring as you go.   Spray the silicone mold with the water/vinegar mix then lightly pack this mix into the mold. 

Add your essential oils to each fizzy.  I use 1-2 drops per fizzy.  Then spritz with water/vinegar mix again.  *Spraying the mold and fizzies with this mix creates a "crust" that holds the fizzy together.

Let the fizzies dry in the tray for 1-2 days (depending on the humidity level where you are) until they are soft but solid and dry on the outside.  Then remove from the silicone mold and store in a glass jar or PET plastic container. 
Drop into the toilet bowl 1-2 times per week for a fresh smelling bathroom and cleaner toilet!


Saturday, March 5, 2016

The Craft Fair Mommy

I am a craft fair mommy.  I set up booths and sell my wares and I take my children with me, half of them anyway!  My littlest is only 4 months old and exclusively breastfed so she goes where I go.  My eldest is 14 and she is my muscle.  She helps me load and unload our products, tables, display stands, etc and helps me man the booth while I am nursing or changing the baby.  Such a big help!  We do on average 1-2 events per month with more during the busy holiday season.  We make friends with our co-sellers and customers and have fun selling as well as shopping.  My eldest has learnt (I hope!) that hard work, ingenuity and creativity pay off.  I can see that being a part of this community of hard working men and women is beneficial to her.  She sees the honesty and integrity of these wonderful people and will hopefully learn to behave in like fashion and pick up a positive lifelong work ethic.  She isn't always thrilled to get up early on a Saturday and load up boxes and bags of crafts and doTERRA products but she always has fun at the events that we work.  I get to enjoy a day spent with my girls and get to watch my little girl become a hard-working young adult.  What a great way to spend a day!?! 


Tuesday, March 1, 2016

Make Me Sleepy Rub- Extra Strength


I posted a recipe earlier for the  "Sweet Dreams Spray" that I use for my kids.  I have had a few insomniac friends ask me to mix them up the same spray.  Some of these friends said that the spray worked wonders and for others it just wasn't enough.  This is the mix that I use for folks (adults only!) that really have a hard time getting to or staying asleep.  I call this mix the "Make Me Sleepy Rub- Extra Strength".


I start with 1/3oz roller bottle.  I like the blue bottles because the dark glass protects the oils from damaging sun rays.  


I add 15 drops of Lavender EO, 10 drops of Vetiver EO, 8 drops of Roman Chamomile EO, 5 drops of Frankincense EO and 5 drops of Wild Orange EO by dropping the oils directly into the roller bottle.  


After I have all the essential oils in the bottle, I fill the roller bottle with Fractionated Coconut Oil,  insert the roller ball plug and put the cap on the bottle.  That's it! So easy to make and works so well!

To use just shake and roll onto the bottom of each foot at bedtime.  I hope this mix will help any of you non-sleepers out there!