Tuesday, May 31, 2016

Rocking Horse Restoration


As I have mentioned in earlier posts I come from a long line of... savers, packrats, hoarders?  I am not sure what the accepted vernacular is but either way we have stuff, lots of stuff.  My dad has saved several of my childhood toys, keepsakes, and school projects.  This pony was given to me by my grandpa when I was about 2 and because my dad held onto it my kids will now be able to enjoy it (the little girls anyway).  I stripped the poor pony of the very little bit of hair that was remaining in his mane and sanded him down to raw wood.  He had been ridden many miles when I was young so I also tightened any loose screws and repaired a damaged corner where our dog had used him as a teething toy. 


I used Chalky and CO chalk paint powder with some blue paint that I had in the garage left over from painting our guest bedroom.   This was my first experience using chalk paint and I loved it!  It covered so easily and dried quickly.  

That's daughter #2 helping with daughter #4 in the background.

I use a Jacobean colored sealing wax from Chalky and CO to seal the paint after I painted and distressed the project giving it an antiqued look.  Then I used a dark gel stain on the handles and rocking feet. 


The next step was to use some yarn and a staple gun to give this little guy a new mane and tail. 
I gathered my supplies and began the process.  I looped the yarn around my hand 8-10 times and then cut the loops on one end.  I stapled the yarn to the horse midway up the length of the strips and repeated the process until he had a full beautiful mane.   To do the tail I looped the yarn around a piece of wood about 10" long about 20 times and cut the loops on one end just as I had done with the mane.  I secured it to the horses booty with a staple.


I am so happy with the way he turned out and I am so excited to see my little girls playing with him and enjoying a toy that his been in our family for 30+ years and will hopefully be around for many years to come.  


Tuesday, May 17, 2016

Diffusing Essential Oils


I love using essential oils.  I use them as a natural and chemical free alternative to harsh household cleaners.  I add them to the beauty products that I already use to enhance their effects.  I ingest them, I rub them on and I diffuse them.  Diffusing essential oils is an efficient way to disperse the oils into the air that we breathe.  Each oil has a different effect or impact on every person.  I use lavender in our diffusers at night to help my family wind down after an active day.  I diffuse Elevation blend during parties or family gatherings to promote a light happy mood.  I diffuse On Guard blend during cold and flu season to help ward off those pesky germs that spread the yuckies.   I use the Aroma Ace diffuser offered by doTERRA and I love it!  It is so easy to personalize the experience you receive while using the device.  You can set how potent the aroma released from the diffuser is, how often the diffuser turns on and how long it runs for each cycle.


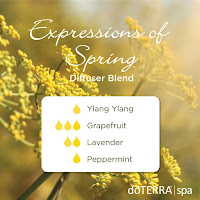
The diffuser is $173.27 retail/ $129.95 wholesale and comes with a 15ml bottle of On Guard Blend ($42.67 retail).  It can be purchased here: www.mydoterra.com/kyliebyerly.  The diffuser also comes with empty bottles so that you can create your own blends to diffuse.  Here are a few blend recipes that I and my family enjoy.


doTERRA offers several other diffusers as well.  Check them out and see if there is one that you would like to have in your home!  www.mydoterra.com/kyliebyerly 


Monday, May 9, 2016

How does our garden grow?


First peach blossoms of the year!

When you have been blessed with 4 beautiful daughters like I have you soon realize that these amazing little creatures who bring so much joy and purpose to your life... EAT and I mean EAT a lot! They are hungry all the time and groceries aren't cheap.  We have, as you know from my earlier post found here http://kyliebyerly.blogspot.com/2016/04/the-taj-macoop-project.html, purchased 16 chickens so we will be eating eggs for every meal... forever and that will help cut the grocery bill a bit but we needed to do something more to lower grocery costs each month.   (Partial) Solution: massive vegetable garden!   

My handy hubby tilled up a large rectangle of ground roughly 24' wide and 100' long while daughters #3 and #4 supervised.  Yes daughter #3 is wearing the baby's blanket as a cape and rocking a pink plastic pirate eye patch.  She's dramatic.


After my handy hubby tilled we began planting.  After all the seeds/bulbs are in the ground we have a row of tomatoes, a row of yellow tomatoes, a row of white potatoes, a row of red potatoes, 3 rows containing 6 types of peppers, 1/2 row radishes, 1/2 row of broccoli, 1/2 row of cauliflower, 1/2 row of garlic, a row of white onions, a row of yellow onions, a row of carrots, a row of celery, a row of iceberg lettuce, a row of romaine lettuce, 2 rows of cucumbers, 2 rows of watermelon, and 5 rows of corn!! We will also have beens and peas but they will be planted on the side of the house where there is more shade.


It was breezy and cool on planting day so we had to "build" a wind wall to protect little baby from the elements. 

Winter before last my handy hubby and I "remodeled" the stair case in our living room.  We replaced the wooden balusters with decorative metal ones and resurfaced the hand rail and step edges with a darker color stain. After the project we had more than 40 wooden balusters that we no longer needed, but being my father's daughter and my grandmother's granddaughter (thanks for the packrat gene!) I couldn't bring myself to junk them.  Thankfully I did listen to my grandmother's voice in my head and kept them because they make great row markers!  


In addition to our awesome vegetable garden we also have some fruits: 3 peach trees, 2 blueberry bushes and 4 raspberry bushes.  Our next project is to demo 2 sections of yard to be replaced with strawberry plants.  Yummy!

Feeding 4 Little Byerly's isn't cheap but between our chickens, veggies and fruits we are off to good start!  Also, I feel that working outside, in the dirt with our hands is beneficial to us all.  The girls learn just how much work it takes to put food onto the table and we all get to spend quality time together.    Daughter #1 loves that she gets to get muddy and daughter #2 loves that she gets a tan.  She is 11 and priority #1 is appearance.  Daughter #3 absolutely loves picking raspberries with her daddy and riding the tractor with him.  Daughter #4 loves just being outside!  My handy hubby and I love that we don't have to pay $4.99 for a tiny box of blueberries or $12.99 for a 5 dozen pack of eggs.  I also love that I know exactly what is added to the soil and sprayed onto the plants that my family eats!


Wednesday, May 4, 2016

Detox Bath Salts


One of my favorite ways to relax and wind down after a busy day is to take a hot bath and read a good book.  I love bubbles and quiet time!  One of the extra benefits of my bathtub time is that I can rid my body of some yucky toxins while I am in there.  I add detox bath salts to make this happen.  They are easy and inexpensive to make and I love what they do for my body.  In addition to the detoxing quality of the salts you can add even more therapeutic benefits by adding Essential Oils to your salts.  Add Lavender for a calming effect or Deep Blue for sore muscles.

Detox Bath Salts

4 ounce Plastic PET or glass  container
2 ounce Baking Soda
2 ounce Epsom Salt
1 tbsp Ginger
3-4 drops Essential oils of choice

I start by gathering my containers and supplies.


I fill my container about 1/2 way full with epsom salts.


Then I add the ginger and essential oil.  I chose Citrus Bliss for this batch.  It has an uplifting effect on me.  


I fill the rest of the container with baking soda, put the lid on and shake, shake, shake it.


I add 2-3 tbsp of the salts to my bath water and soak for 20-40 minutes.  Be sure to drink lots of water during this process to help carry the toxins out of your body.  Enjoy!